I went to a drugstore the other day to get passport photos and they were charging $8.99 for each set of two.
$9 might be worth the convenience to some but long term travelers need extra passport photos in order to get visas while traveling and would rather spend the money on their trip. I wanted ~20 extra pictures because I don’t know how long my trip will last or where I’ll end up.
At the drugstore I went to, there was no price break on multiples so it would have cost me over $90 for just twenty pictures ($8.99 per set of 2 pics, plus tax). I thought this was insane.
Instead of handing over enough money to be able to pay for a weeks worth of travel in Southeast Asia, I opted to find another solution, taking my own pictures and making my own.
What you’ll need:
- A digital camera
- A computer
- A photo printer (or nearby photo printing center)
- A friend
Step 1: What to wear
The U.S. government has a pretty strict set of guidelines for passport photos, they want you to look like your everyday self.
You should:
- Wear your everyday clothing and hairstyle. Uniforms and costumes are not acceptable, unless they’re worn daily for religious reasons. It will help you down the road to avoid wearing anything that may be offensive to other cultures.
- No electronics can be in the photo. That means no headphones, Bluetooth earpieces, etc.
- No hats, sunglasses, glasses with any tint are allowed (if you wear prescription glasses, those are okay).
- Wear a neutral face, nothing silly.
To check out the complete list of guidelines visit the U.S. Department of State’s Web site.
Step 2: Setting up the shot
The pictures need to be taken in front of a white or cream-colored background (try and find a wall or turn around a large poster). Next, make sure the lighting is right as to prevent any shadows or glare (You may have to experiment with different times of day for natural light, or turning on/off the lights in your house. You should either be standing or sitting on a stool, in order to avoid having a chair’s back in the picture.
Step 3: Shooting, editing and printing
Once the lighting looks good and you’re following the government-approved look, frame the shot. There should be plenty of headroom as well as room around your arms and below shoulders. It’s better to be a little zoomed out since you’ll be able to crop later.
Take a few pictures and upload them to your computer.

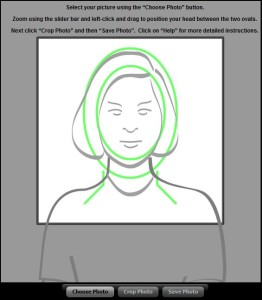
Once you’ve found the picture you want to use (the one that turned out best) upload it to the U.S.’s passport photo-resizing tool and create your own passport photo.
The tool helps you line up the picture to be cropped to specifications. Use the overlay to match up your head and body, zooming in or out or moving the picture around as needed. Once you are satisfied save the cropped photo.
The tool will save it as a 2×2-inch photo, which you can print at home or though a service. If you’re printing at home, use your photo printer to print your pictures on matte or glossy photo paper. If you don’t have a photo printer, you can use a service like Shutterfly to print the out at your local drugstore.
Only one photo needs to be attached to your passport application, but I recommend you print extra. If you plan to travel for awhile, bring additional copies with you in case you need at the boards when you need an entry visa.
 Where's WiL My around the world solo travel blog


That’s cool! I didn’t know about the official cropping tool available. Thanks for sharing!
Another way of saving- to pay $8.99 for one set, then scan it with 600 dpi (a slow and very detailed scan) and as many copies as you wish.